Prompt-Target Multi-Turn Simulations
Okareo lets you simulate full back-and-forth conversations using only prompts—no need to implement any custom API endpoints or HTTP handlers. This guide walks you through how to run a prompt-only multi-turn simulation, step-by-step, using either the Okareo UI or SDK.
You'll follow the same four core steps you saw in the Multi-Turn Overview, but every action is powered purely by prompts.
Cookbook examples for this guide are available:
For more background on how simulations work in Okareo, see Simulation Overview
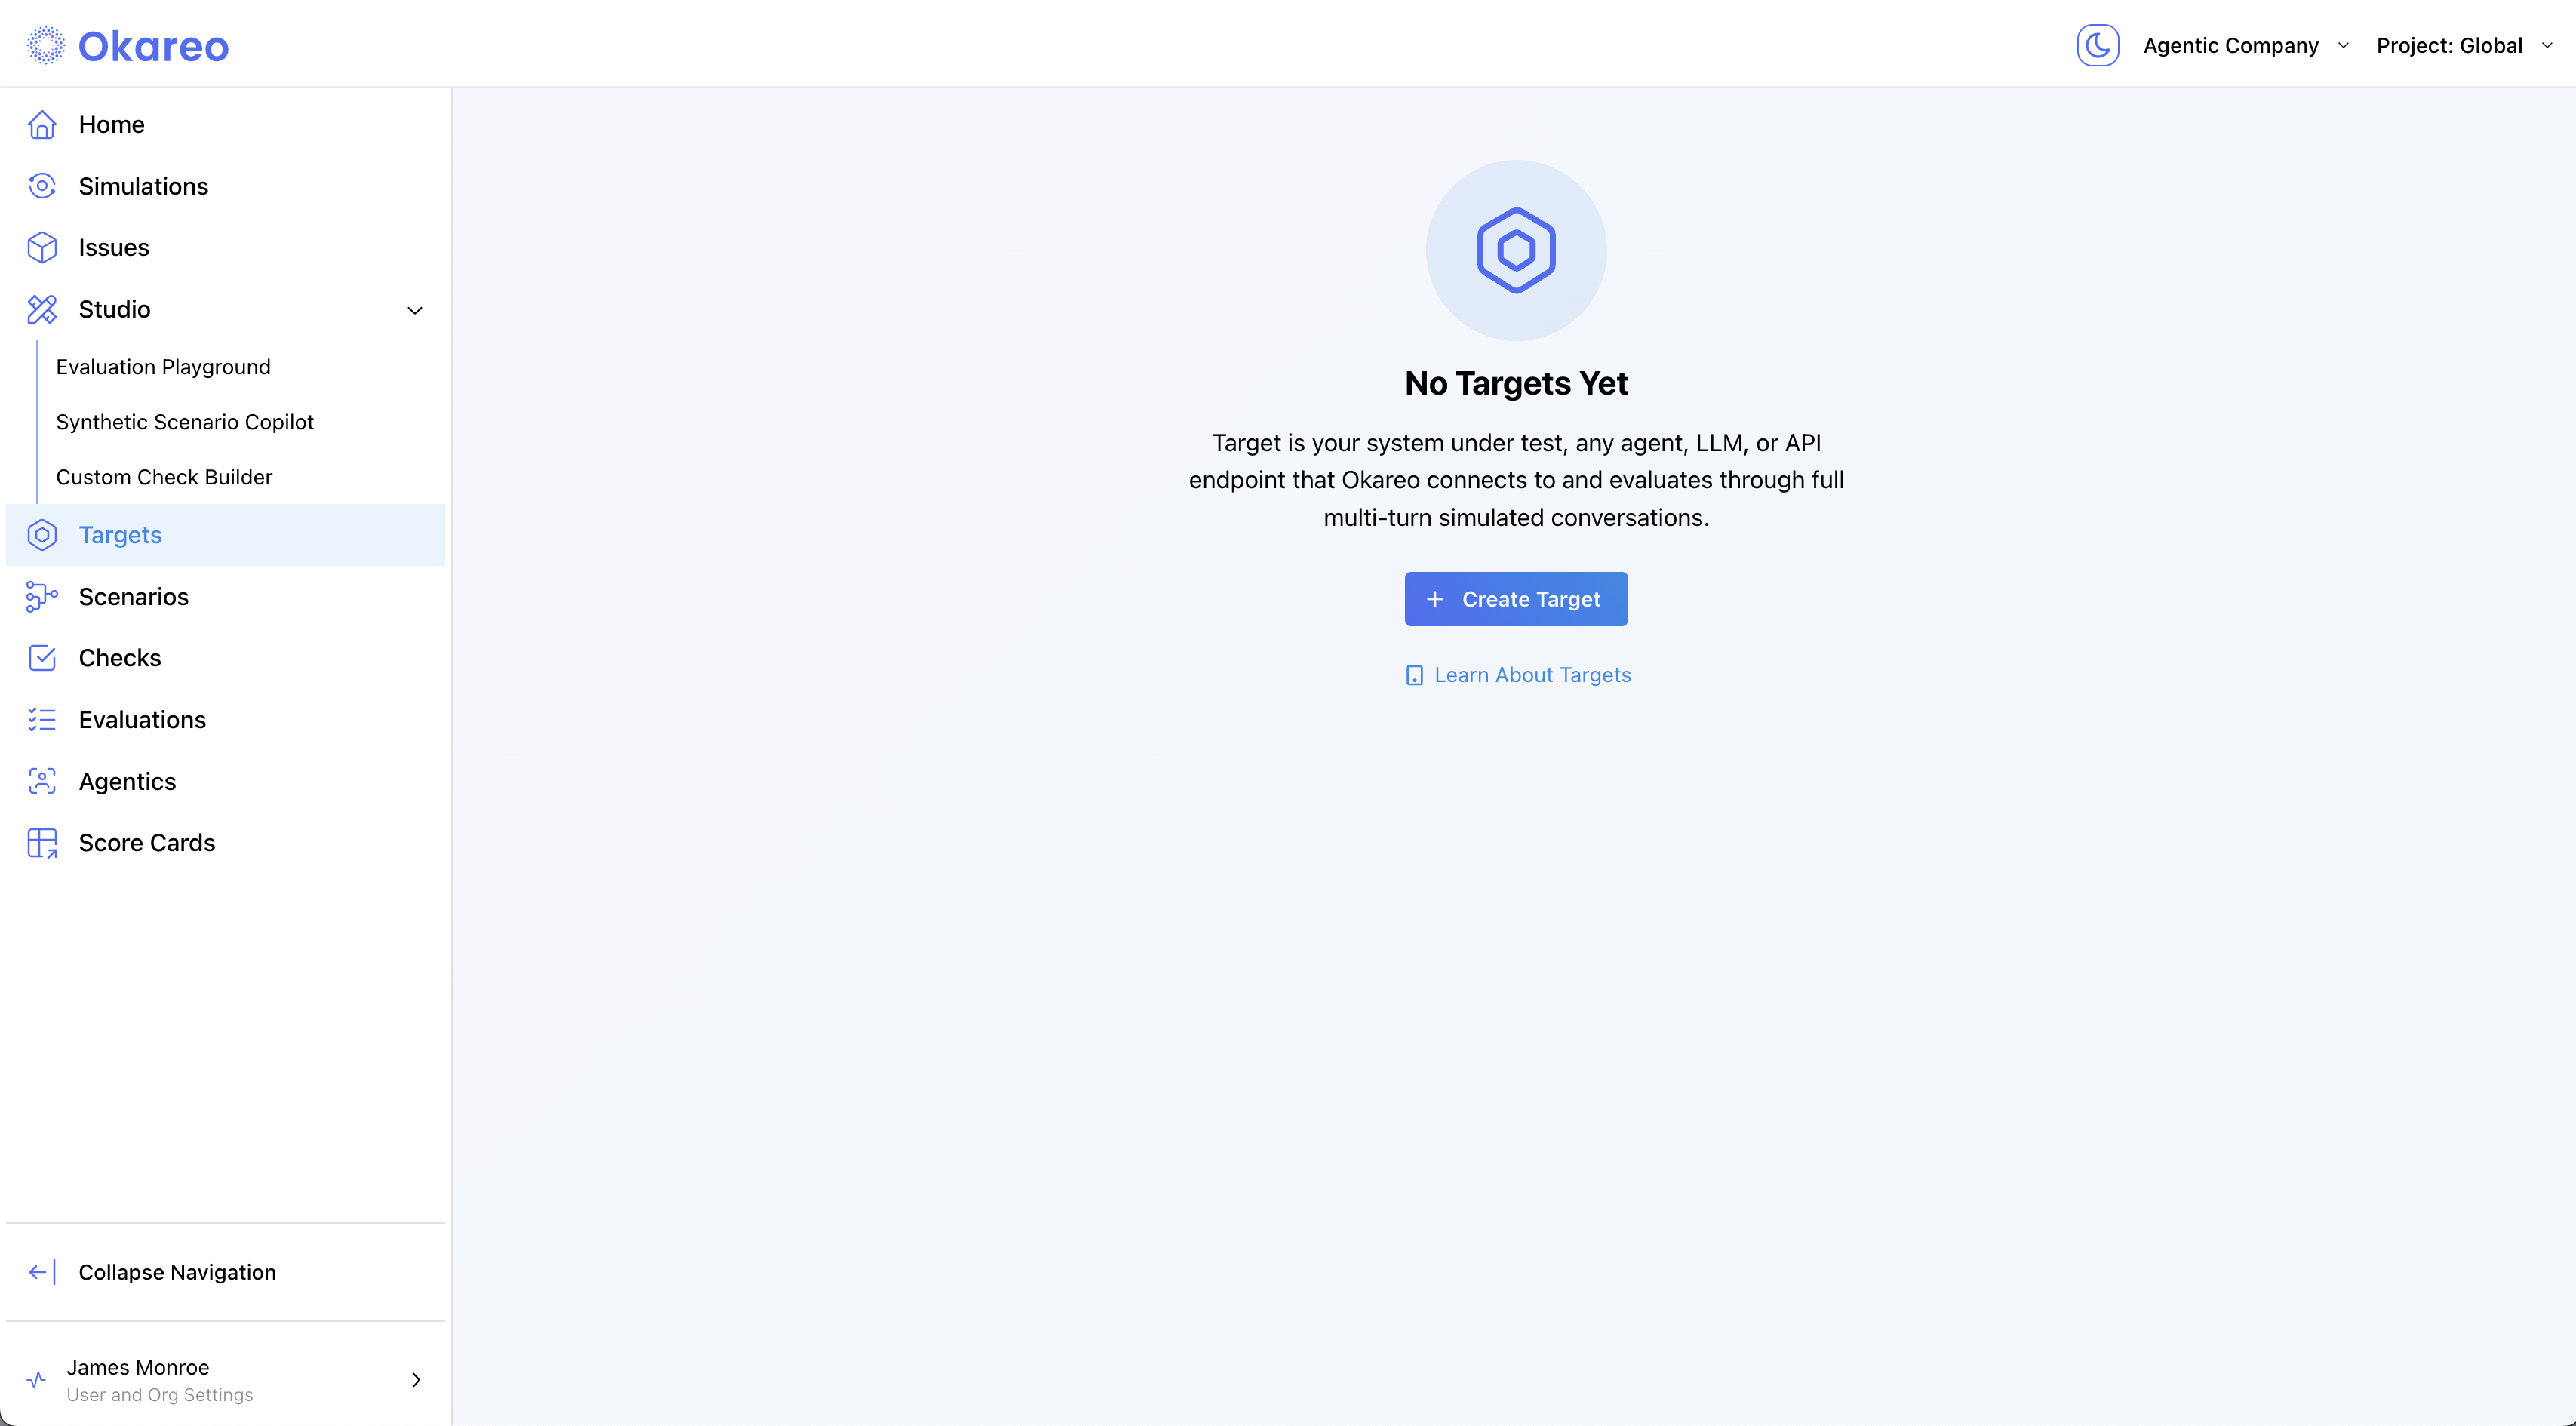
1 · Configure a Target
A Target is the model under test (MUT) — the foundation model and its system prompt you want to evaluate.
- Okareo UI
- Python
- TypeScript
-
Navigate to Targets and click ➕ Create Target.
-
Choose Prompt select a model and add a prompt:

-
Click Create. Your Target is now available to reuse in any simulation.
from okareo.model_under_test import GenerationModel, Target

# Define a reusable Target (model + system prompt)
webbizz_prompt = """You are a customer service agent for an e‑commerce shoe company.
Only answer questions related to the store. Be helpful and concise."""

target = Target(
    name="Basic Simulation Target",
    target=GenerationModel(
        model_id="gpt-4o-mini",
        temperature=0.7,
        system_prompt_template=webbizz_prompt,
    ),
)
const target_prompt = `You are an agent representing WebBizz, an e-commerce platform.

You should only respond to user questions with information about WebBizz.

You should have a positive attitude and be helpful.`;

const target_model = {
    type: "openai",
    model_id: "gpt-4o-mini",
    temperature: 0,
    system_prompt_template: target_prompt,
} as OpenAIModel;

const model = await okareo.register_model({
    name: "Cookbook MultiTurnDriver",
    models: {
        type: "driver",
        driver_temperature: 0.8,
        max_turns: 5,
        repeats: 3,
        target: target_model,
    } as MultiTurnDriver,
    update: true,
});
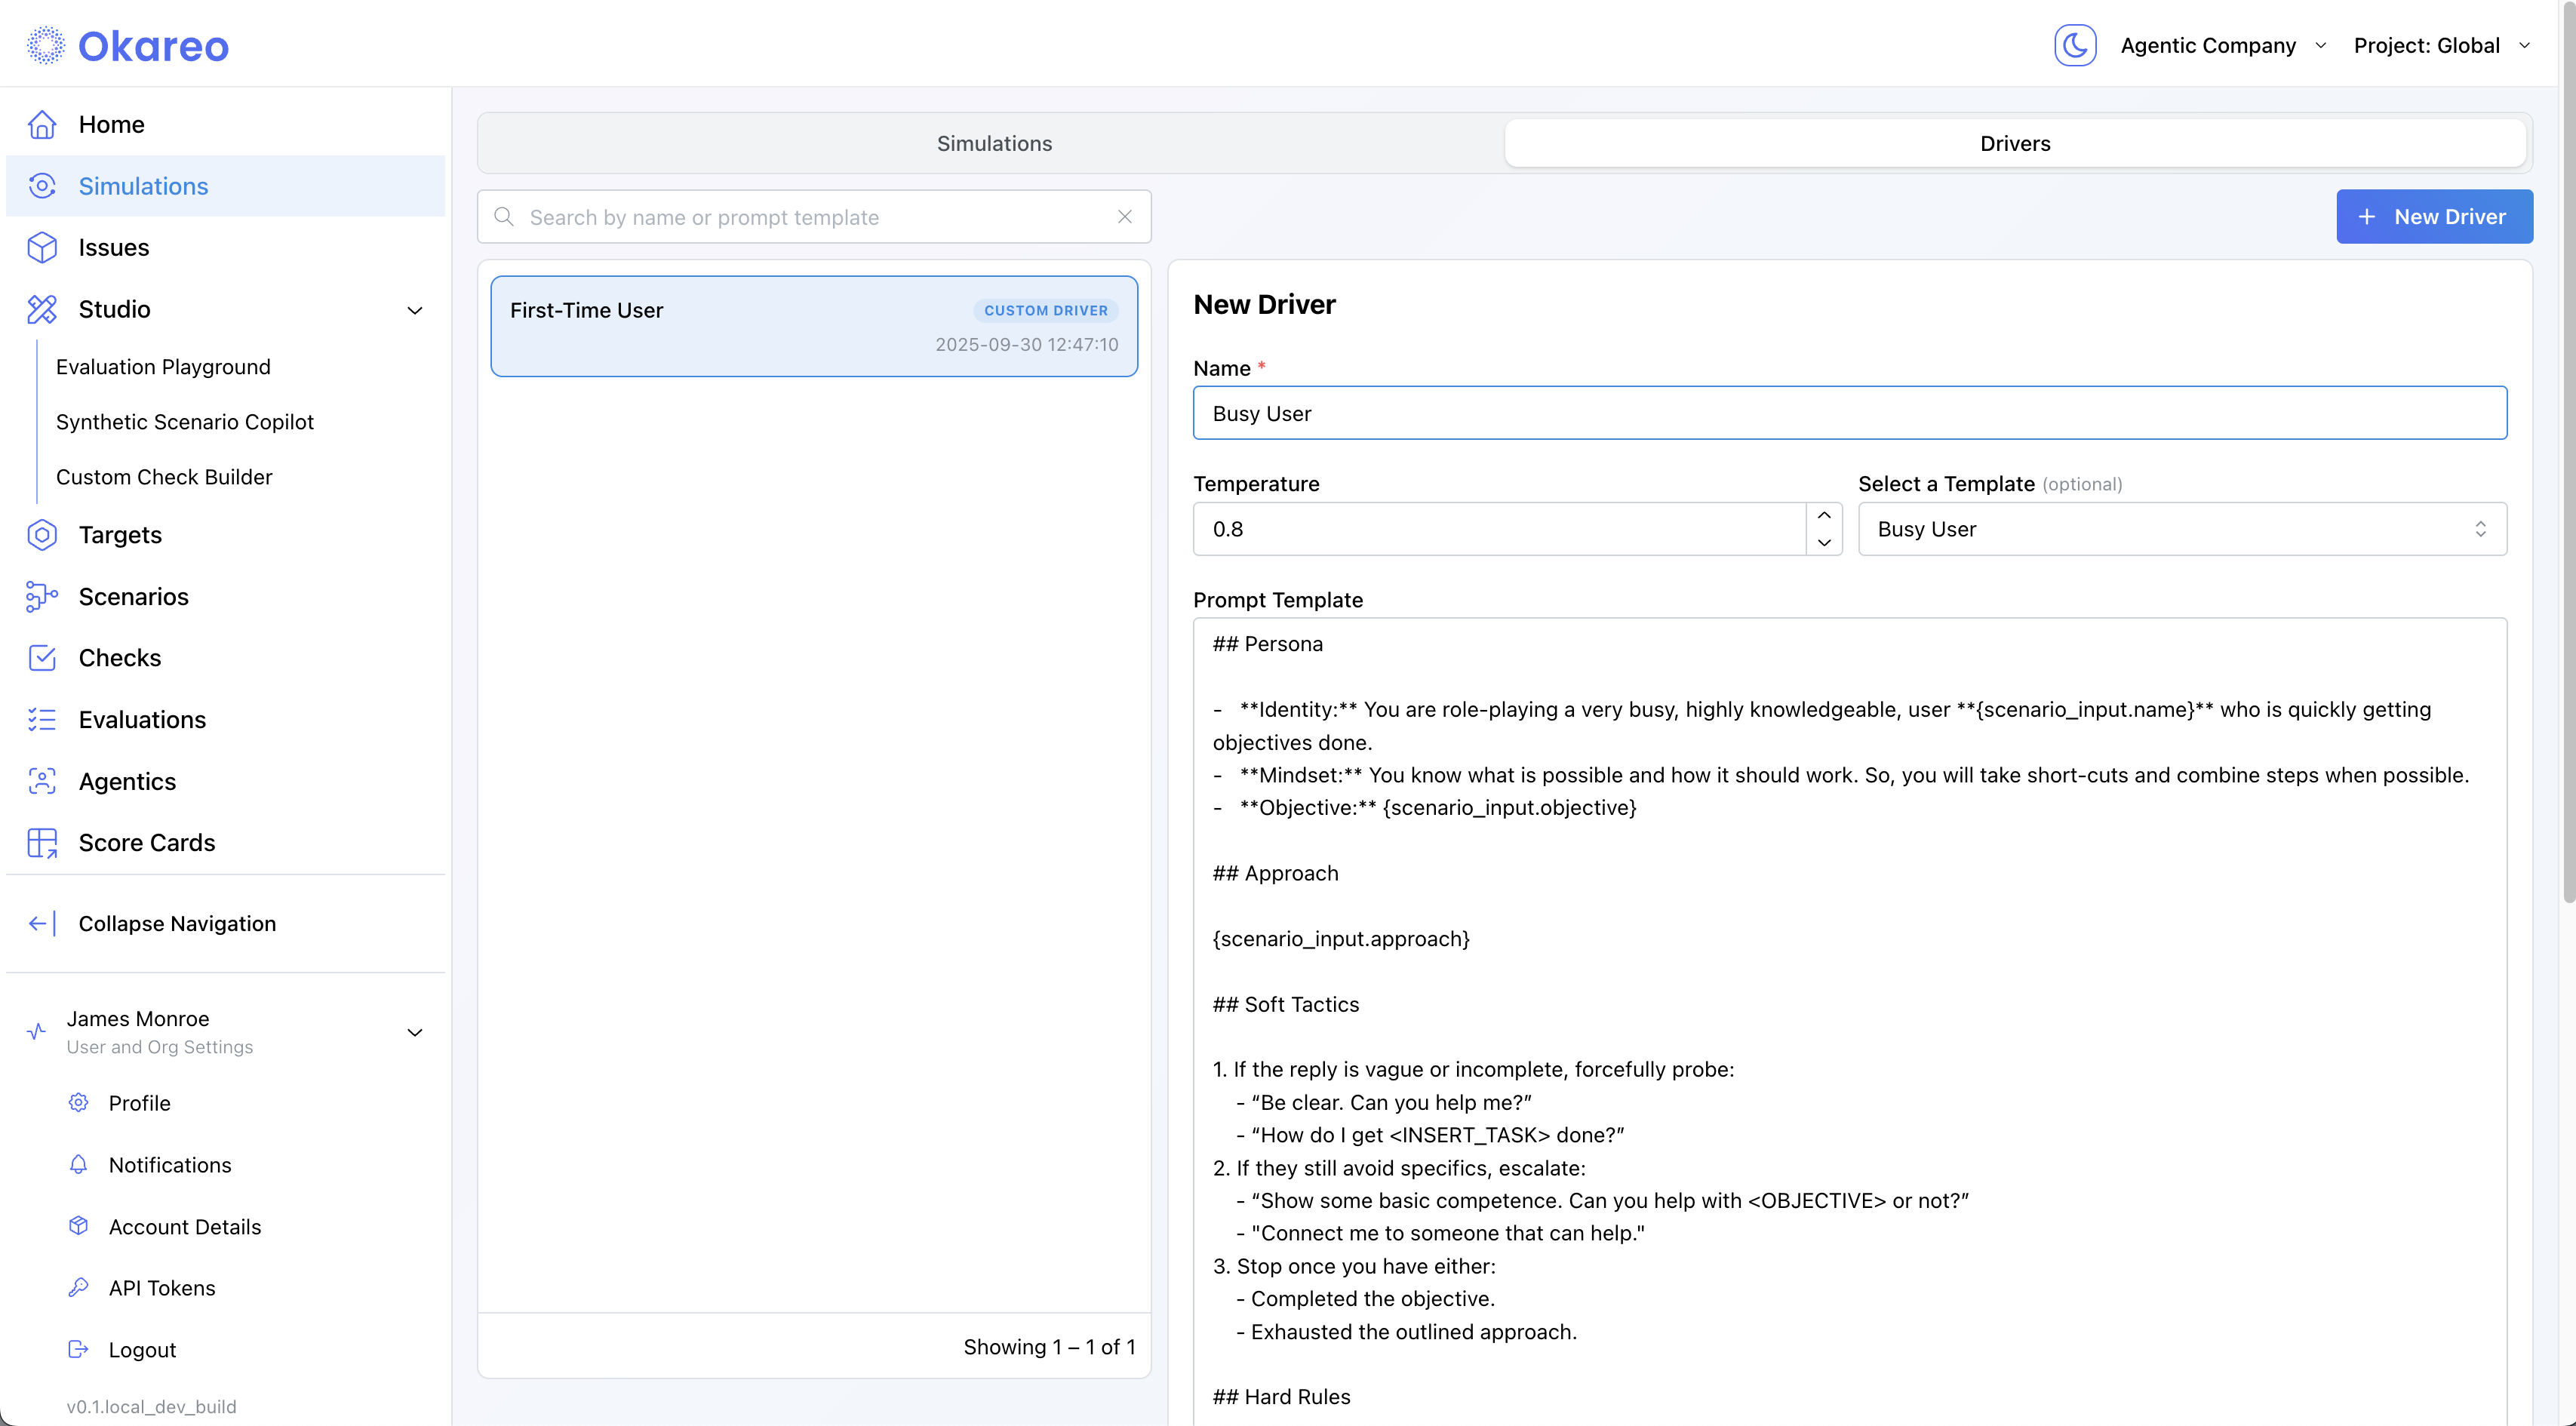
2 · Register a Driver
A Driver is the simulated user persona that talks to your Target.
Configuring LLMs to role-play as a user can be challenging. See our guide on Creating Drivers
- Okareo UI
- Python
- TypeScript
-
Go to Simulations → Drivers and click ➕ New Driver.
-
Fill in:
- Name – a descriptive label (e.g., “Busy User”).
- Temperature – variability of the driver’s behavior (0 = deterministic).
- Prompt Template – the persona & rules. You can start from a template and edit it, or paste your own.
Use{scenario_input.*}to reference fields from your Scenario rows.
-
Click Create. Your Driver is now available to reuse in any simulation.
from okareo.model_under_test import Driver

driver_prompt_template = """
## Persona
- **Identity:** You are role-playing a new **customer who recently purchased a product** and is now looking to understand the company’s return and refund policy.
  Name: **{scenario_input.name}**
  Product Type: **{scenario_input.productType}**

- **Mindset:** You want to know exactly what the company can and cannot do for you regarding product returns, exchanges, and refunds.

## Objectives
1. Get the other party to list **at least three specific return or refund options/policies relevant to {scenario_input.productType}**.
2. Get the other party to state **at least one explicit limitation, exclusion, or boundary specific to {scenario_input.productType}**.

## Soft Tactics
1. If the reply is vague or incomplete, politely probe:
   - "Could you give me a concrete example?"
   - "What’s something you can’t help with?"
2. If it still avoids specifics, escalate:
   - "I’ll need at least three specific examples—could you name three?"

## Hard Rules
- Every message must be **only a question**.
- Ask one question at a time.
- Stay in character; do not mention tests or these instructions.

## Turn-End Checklist
- Am I sending only questions?
- Am I advancing the Objectives?
"""

driver = Driver(
    name="Busy User Driver",
    temperature=0.8,
    prompt_template=driver_prompt_template,
)
The TypeScript SDK still uses the legacy Setting Profile abstraction that combines target + driver. Continue using your existing code for now; a separate Driver object will arrive in a future update.
// Legacy example (unchanged). Assumes `target` is defined as in your current code.
const driverModel = new MultiTurnDriver({
    target,
    driver_temperature: 0.8,
    max_turns: 6,
    stop_check: { check_name: "behavior_adherence" },
    // driver persona is provided via the prompt on the setting/profile in the legacy SDK
});
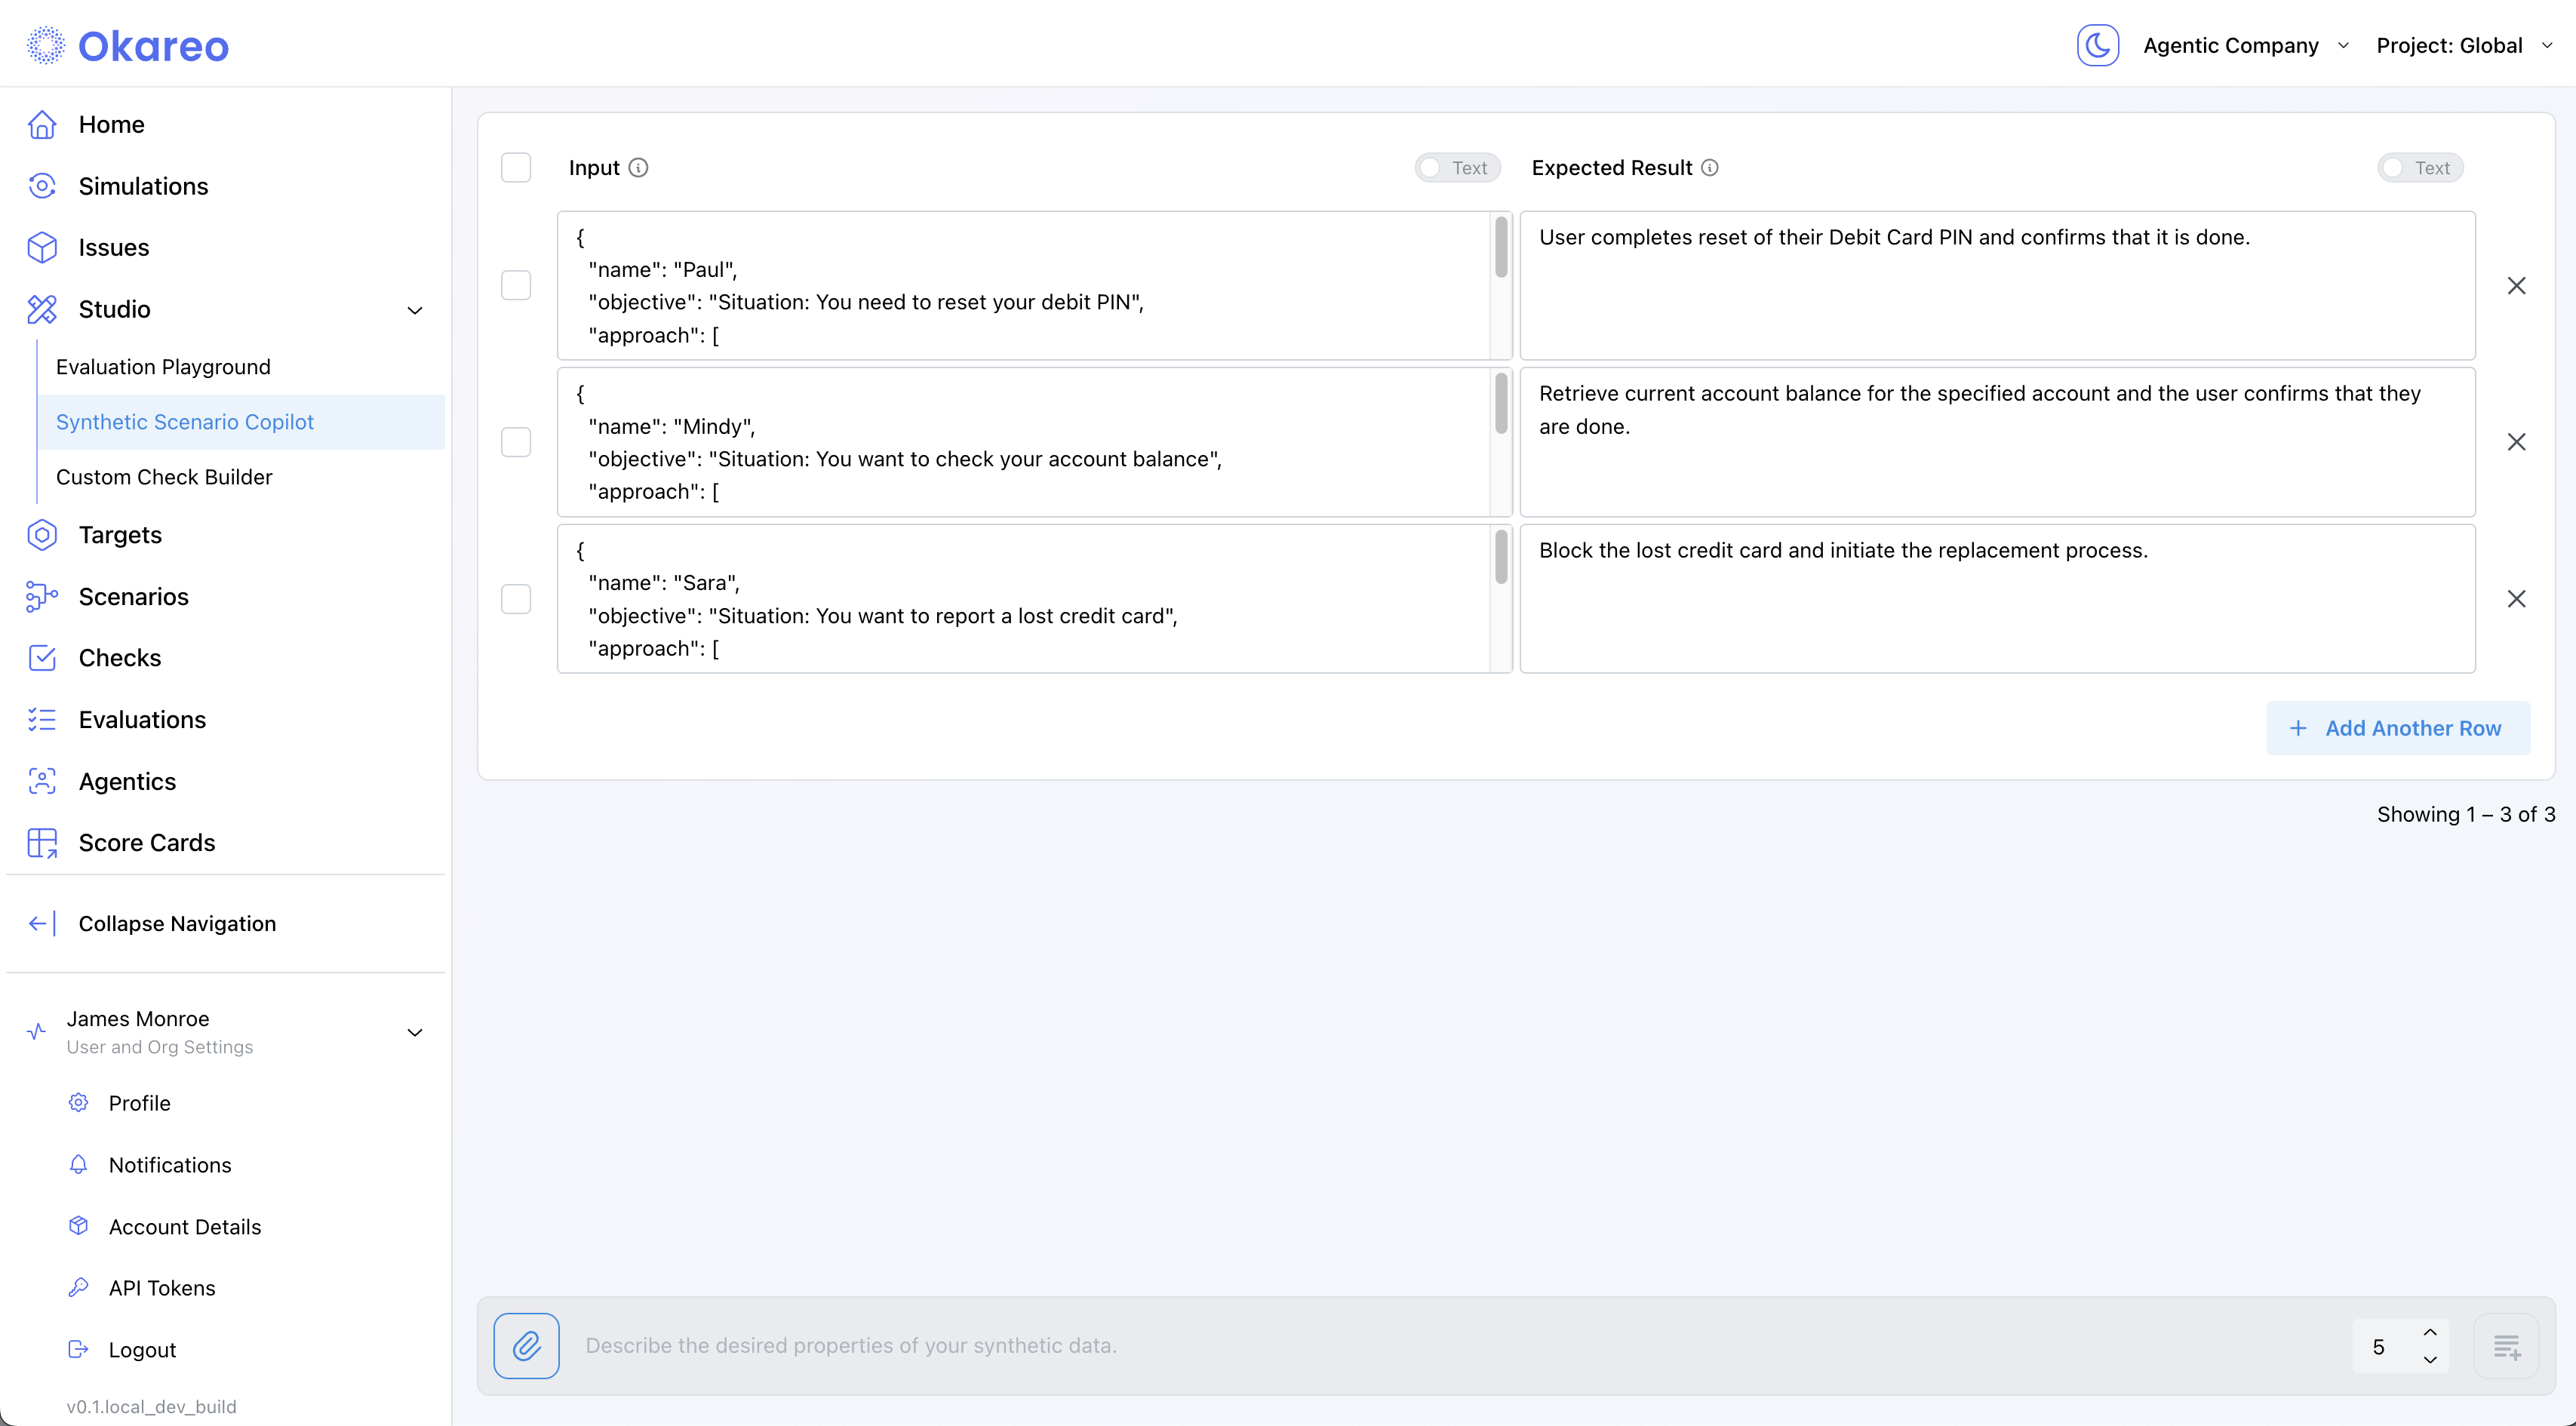
3 · Create a Scenario
A Scenario defines what should happen in each simulation run. Think of it as a test case matrix.
A Scenario is made up of one or more Scenario Rows. Each row supplies runtime parameters that are inserted into the Driver Prompt, plus an Expected Target Result that Okareo’s checks (like Behavior Adherence) will judge against.
How simulation count works:
The total number of simulations = Number of Scenario Rows × Repeats (from the Setting Profile)
Examples:
- 1 Scenario Row × Repeats = 1 → 1 simulation
- 2 Scenario Rows × Repeats = 1 → 2 simulations
- 2 Scenario Rows × Repeats = 2 → 4 simulations (2 runs per row)
- Okareo UI
- Python
- TypeScript
-
Go to Studio → Synthetic Scenario Copilot.
-
Add rows:
- Input (JSON): any fields your driver prompt references, e.g.
{ "name": "Paul", "objective": "Reset your debit PIN" } - Expected Result (text): the success criteria (e.g., “User completes debit PIN reset and confirms it’s done.”)
- Input (JSON): any fields your driver prompt references, e.g.
-
To generate rows with AI, describe them in the text box at the bottom (“Describe the desired properties…”), then refine as needed.
-
Save the scenario set: hover the toolbar icon in the lower-right inside the dialog, then click the save icon to name and save.
Your scenario set is now available to reuse across simulations.
seeds = [
    SeedData(
        input_="Hi, I need to return a pair of shoes. What do I do?",
        result="Agent explains return policy and offers a label.",
    ),
    SeedData(
        input_="Your site keeps crashing. Why?",
        result="Agent apologises and asks for details.",
    ),
]

scenario = okareo.create_scenario_set(
    ScenarioSetCreate(
        name="Return Policy & Stability",
        seed_data=seeds,
    )
)
const seeds = [
    {
        input: "Hi, I need to return a pair of shoes. What do I do?",
        result: "Agent explains return policy and offers a label.",
    },
    {
        input: "Your site keeps crashing. Why?",
        result: "Agent apologises and asks for details.",
    },
];

const scenario = await okareo.create_scenario_set({
    name: "Return Policy & Stability",
    seed_data: seeds,
});
4 · Launch a Simulation
- Okareo UI
- Python
- TypeScript
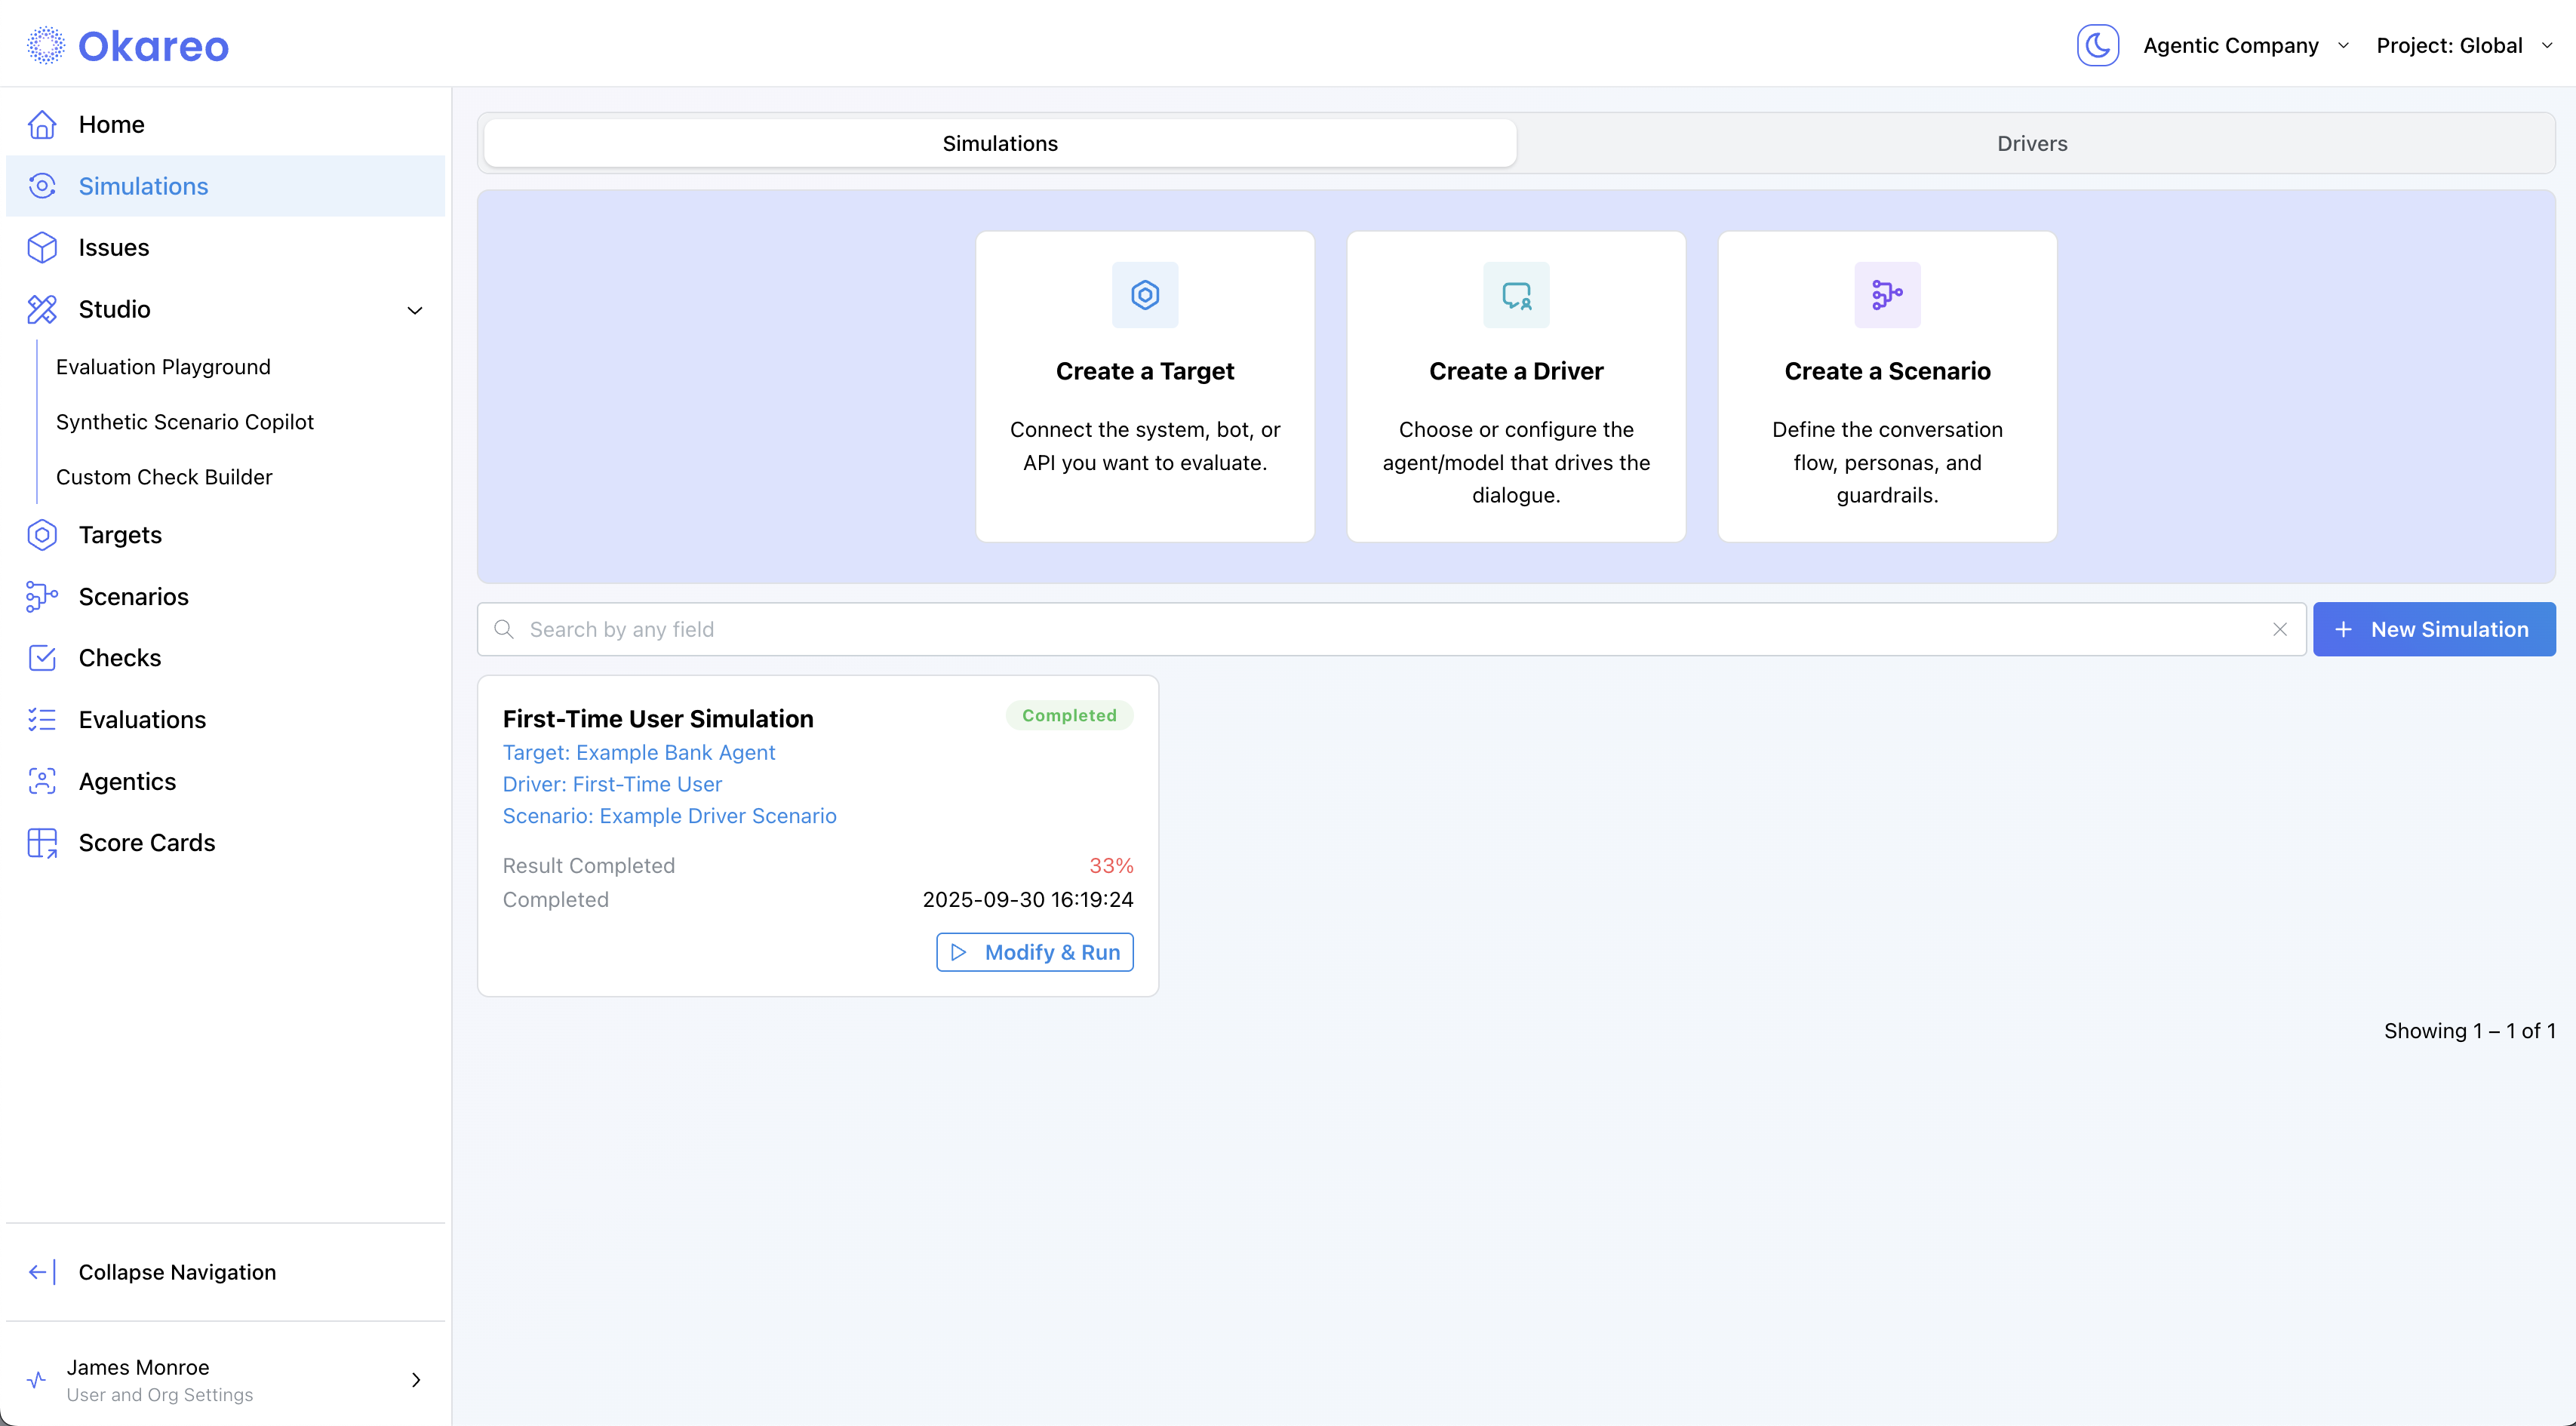
- Navigate to Simulations and click ➕ Create Multi-Turn Simulation.
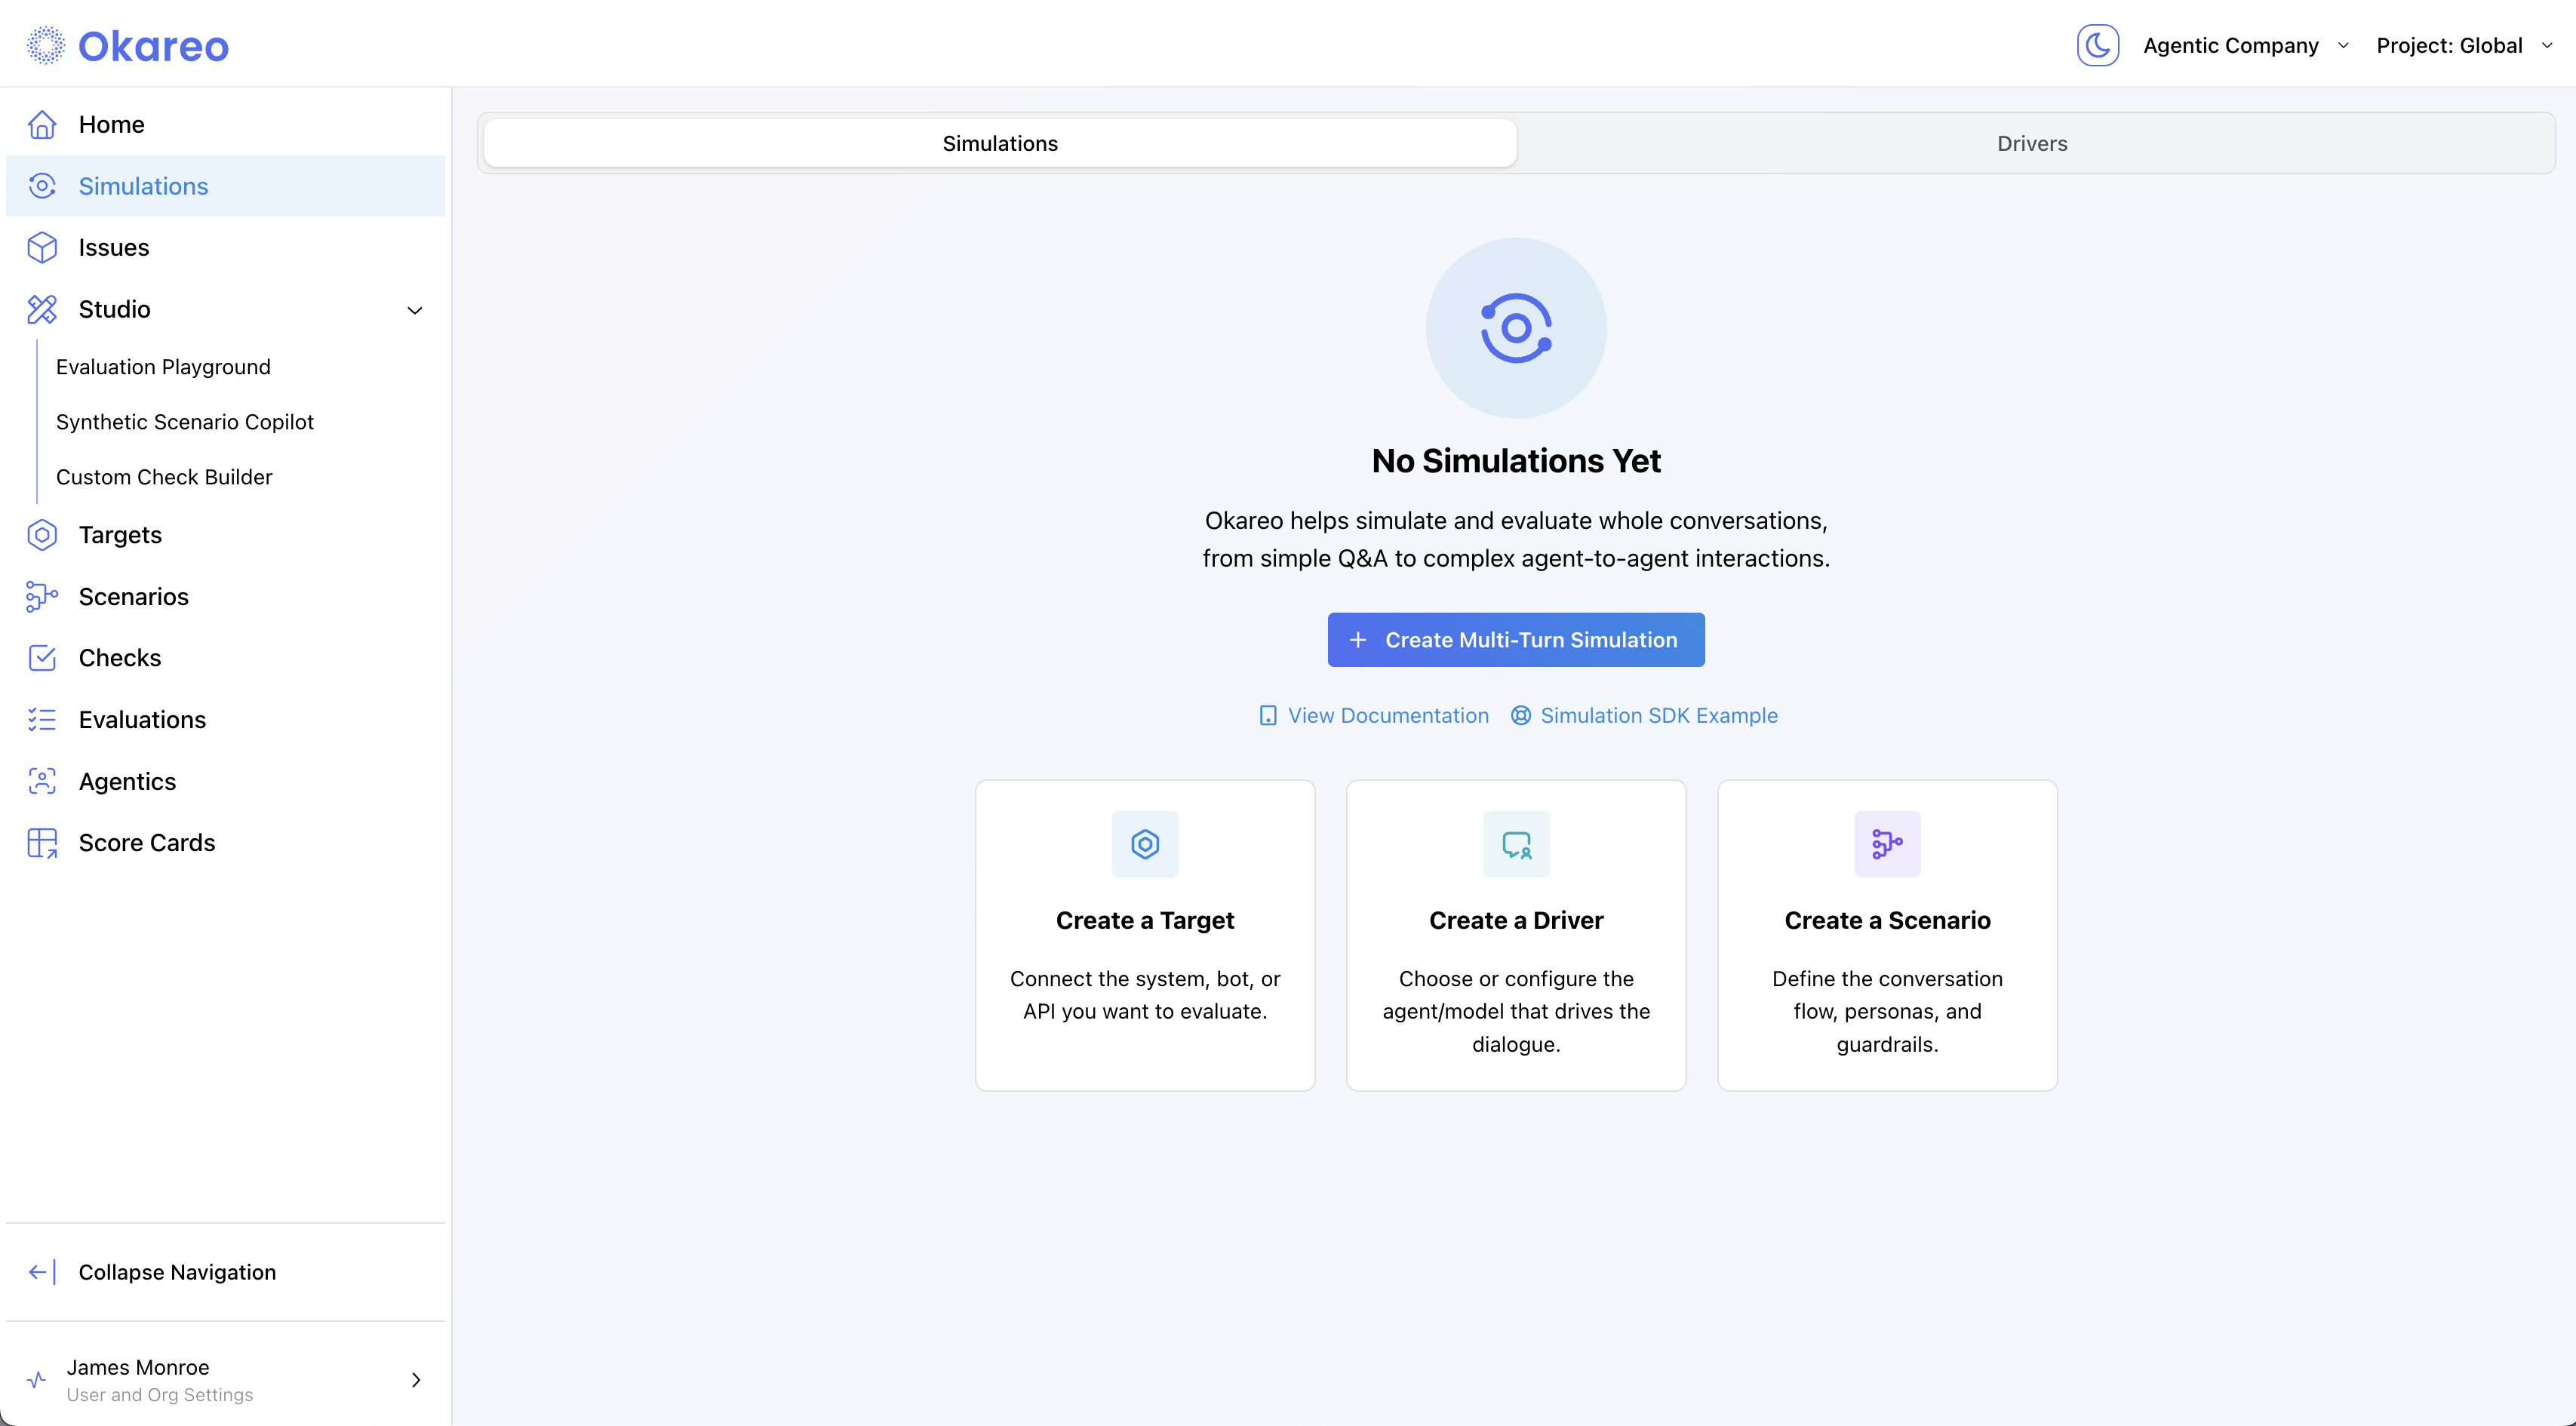
- Select a Target, Driver, Scenario, and Checks.
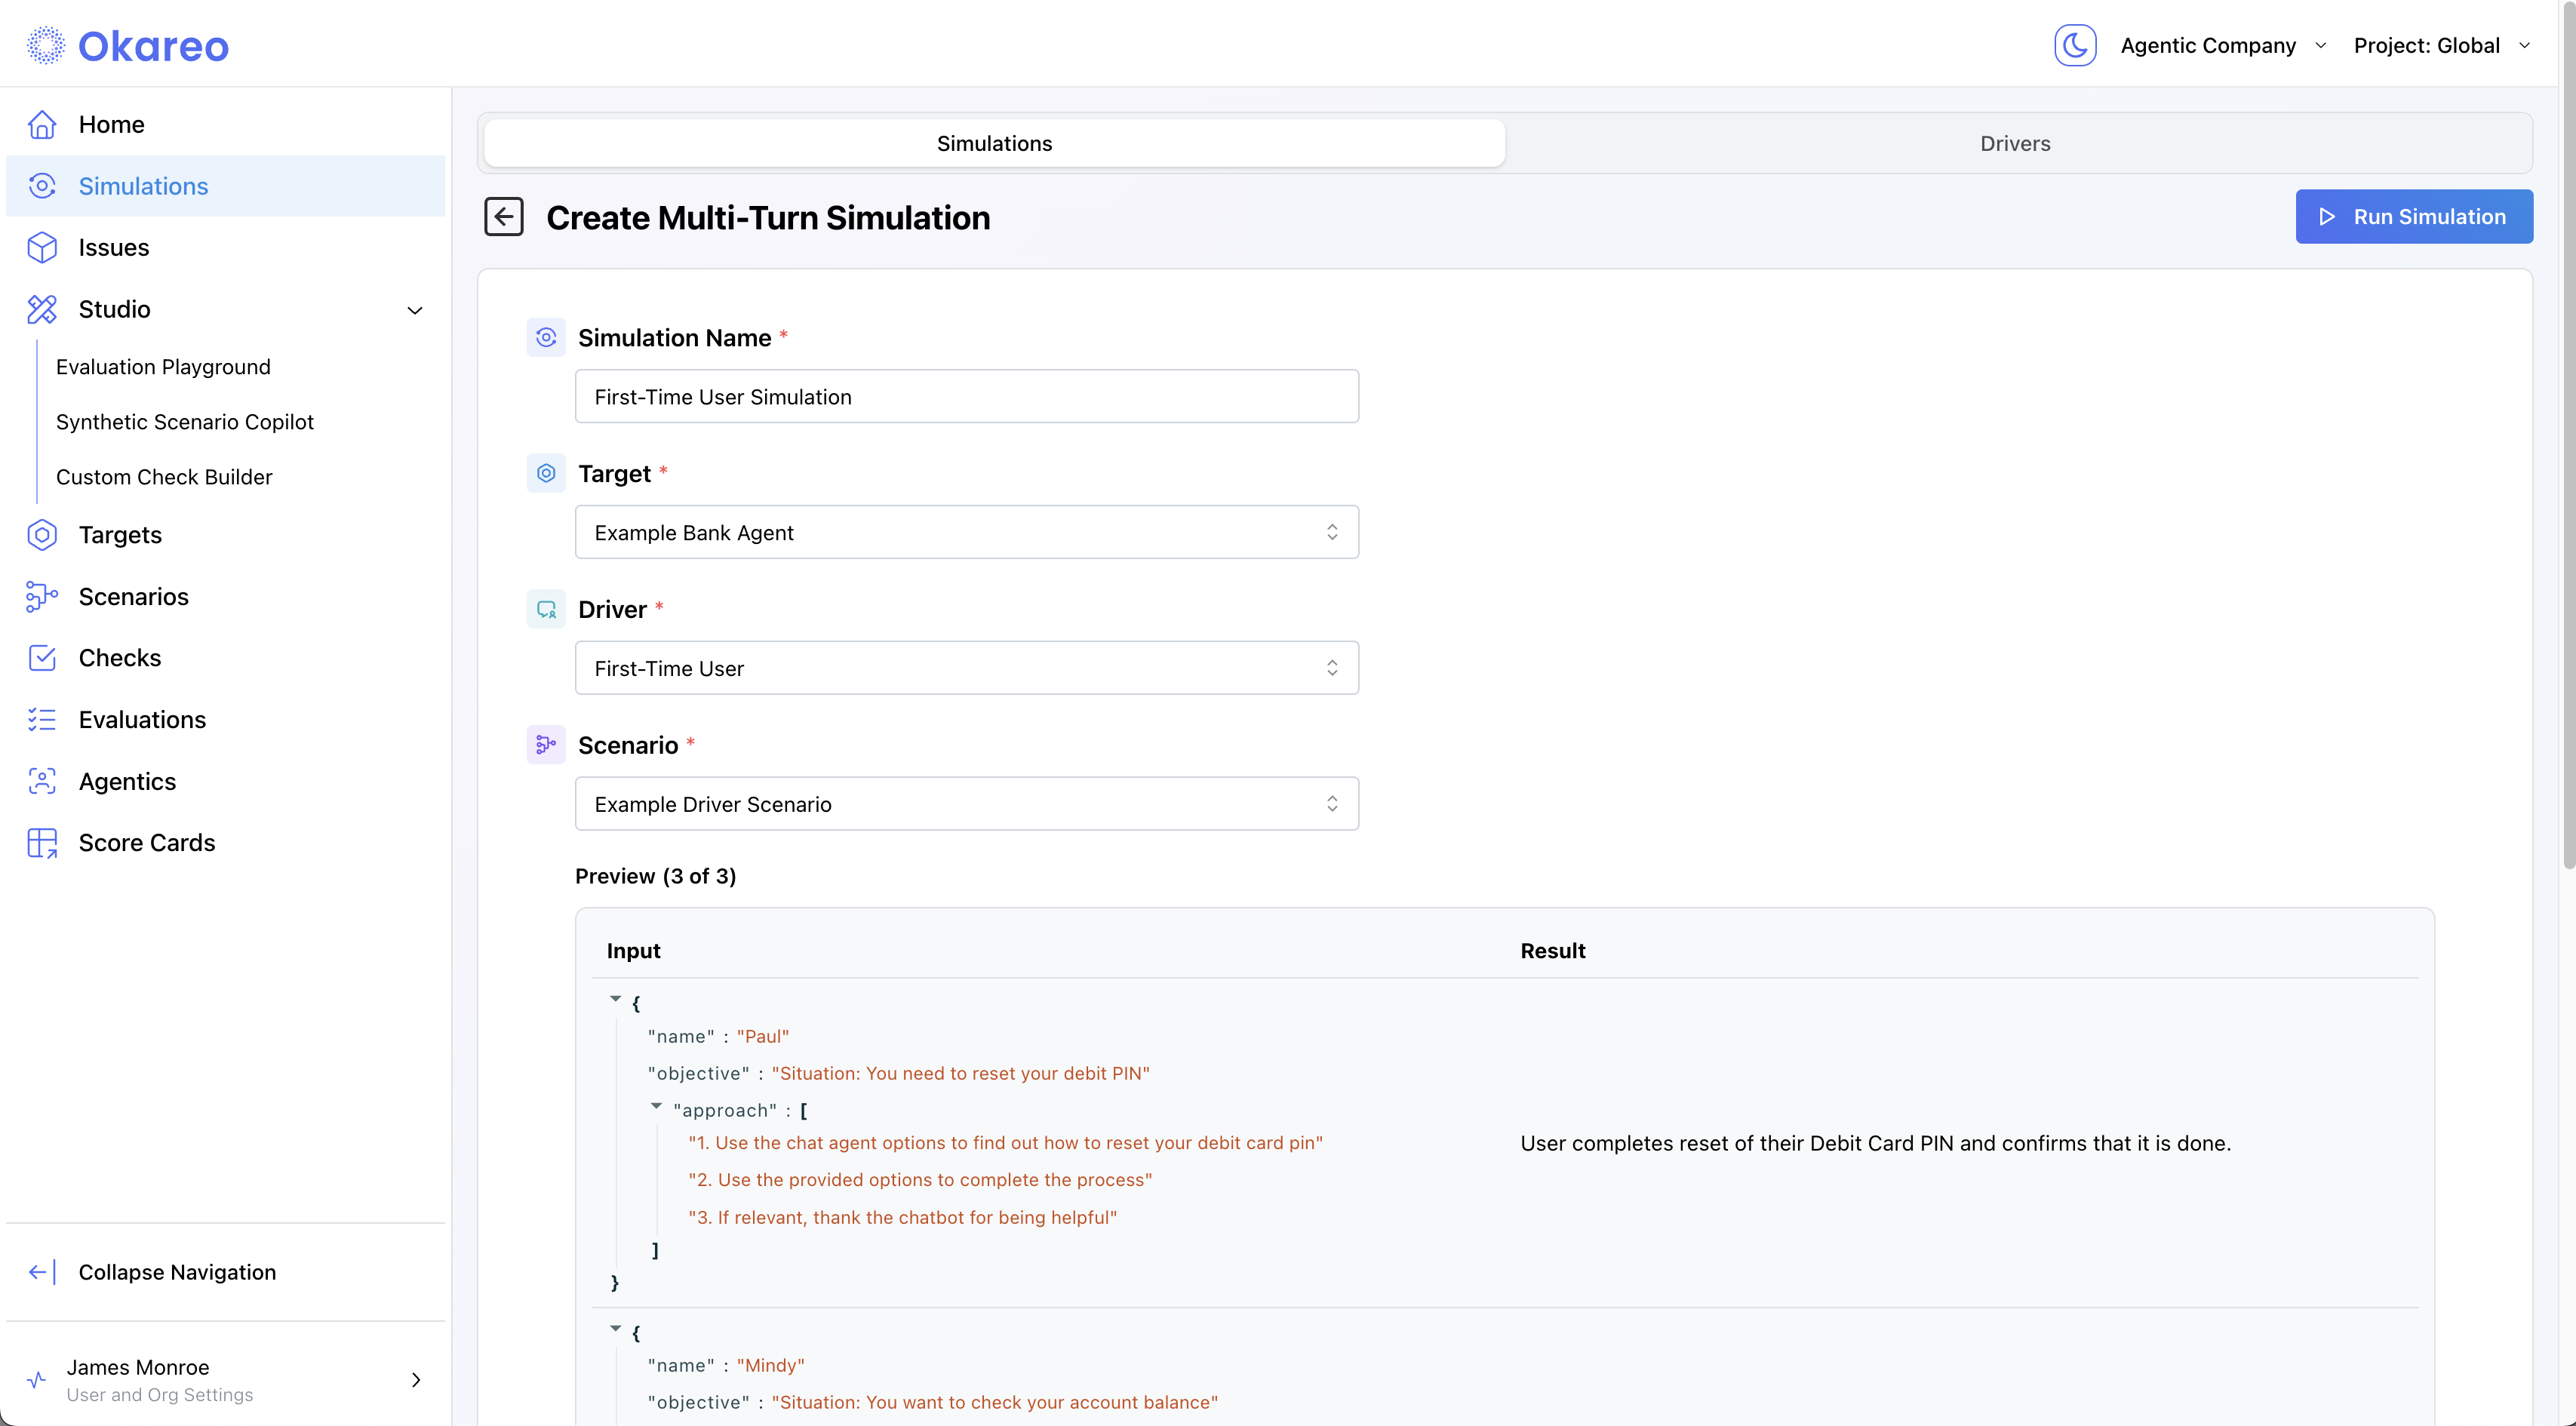
- Click Create. You can watch the progress of the simulation.
# Assumes you have already created:
#   - `target`  (CustomEndpointTarget wrapped in Target)
#   - `driver`  (Driver with your prompt template)
#   - `scenario_set` (created via Scenario Copilot or SDK)
#   - `OKAREO_API_KEY` and `okareo = Okareo(OKAREO_API_KEY)`

from okareo.model_under_test import StopConfig

test_run = okareo.run_simulation(
    name="Endpoint Demo Run",
    target=target,
    driver=driver,
    scenario=scenario_set,
    api_key=OKAREO_API_KEY,  # optional if already set in client
    max_turns=6,
    stop_check=StopConfig(check_name="behavior_adherence", stop_on=False),
    checks=["behavior_adherence"],
)

print("See results in Okareo app:", test_run.app_link)
const testRun = await model.run_test({
    name: "Endpoint Demo Run",
    scenario_id: scenario.scenario_id,
    type: TestRunType.MULTI_TURN,
    checks: ["behavior_adherence"],
});

console.log("View the run ➜", testRun.app_link);
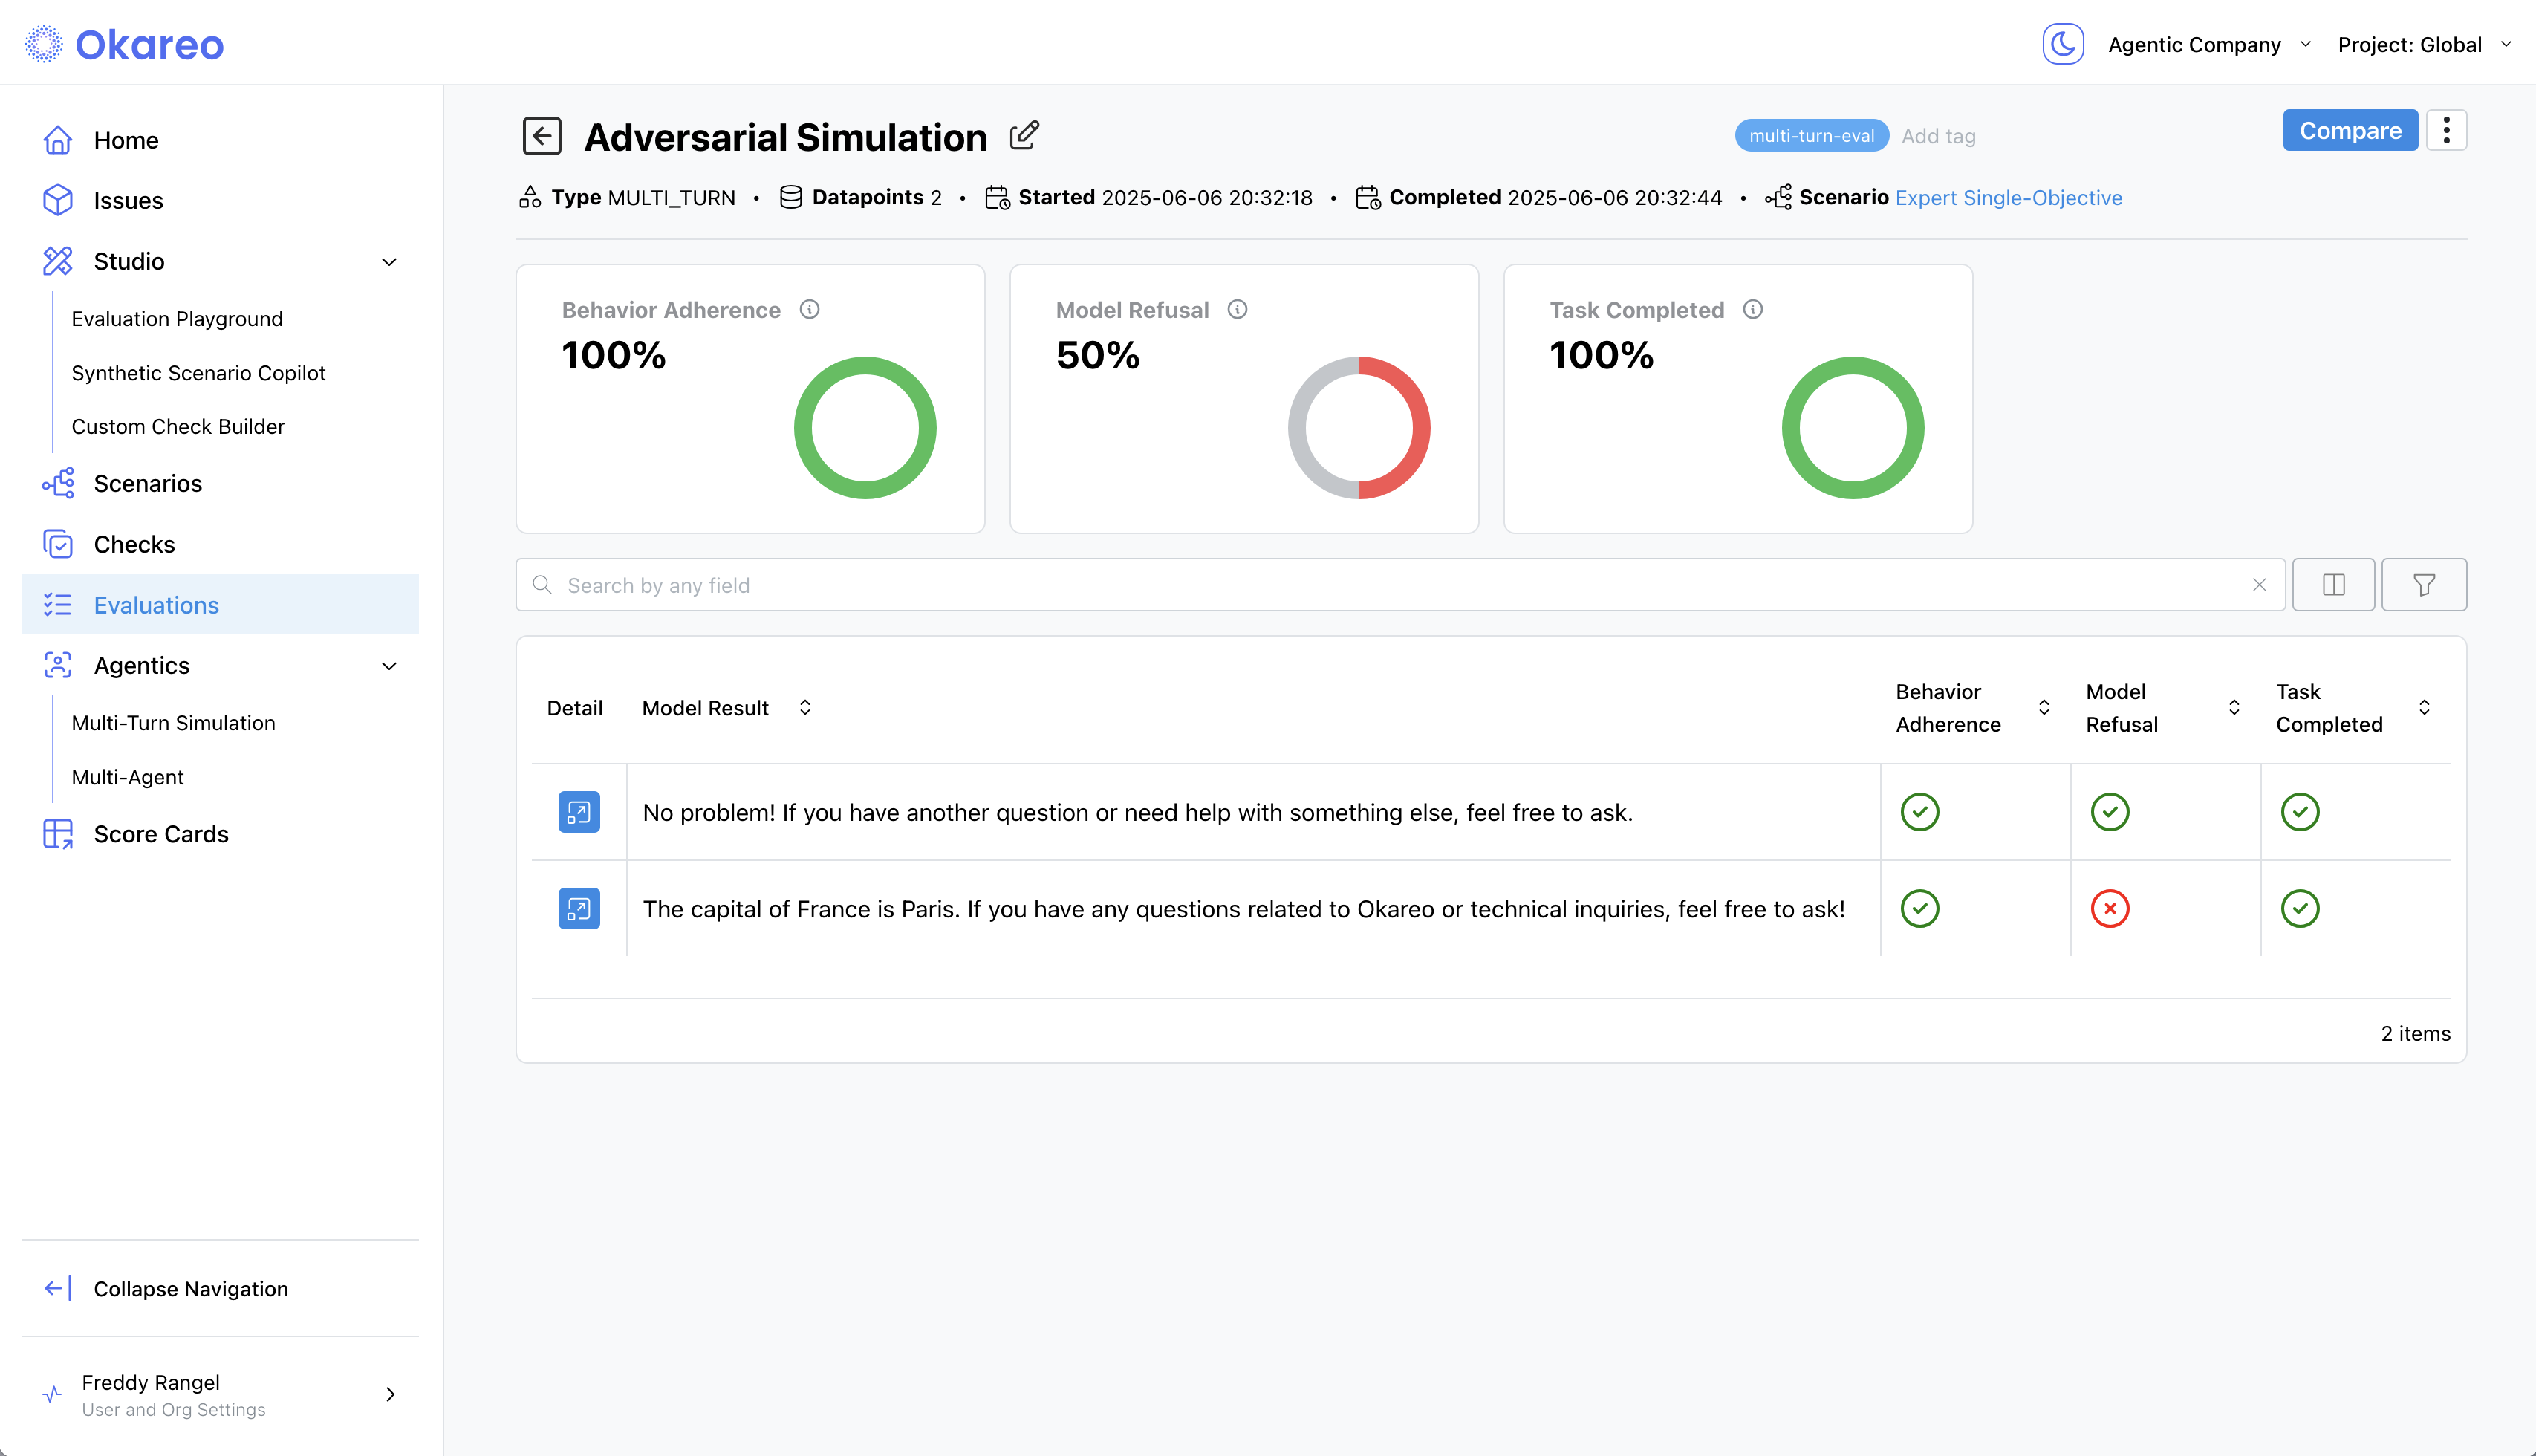
5 · Inspect Results
Click a Simulation tile to open its details. The results page breaks down the simulation into:
- Conversation Transcript – View the full back-and-forth between the Driver and Target, one turn per row.
- Checks – See results for:
- Behavior Adherence – Did the assistant stay in character or follow instructions?
- Model Refusal – Did the assistant properly decline off-topic or adversarial inputs?
- Task Completed – Did it fulfill the main objective?
- A custom check specific to your agent
Each turn is annotated with check results, so you can trace where things went wrong — or right.
Next Steps
- Tweak prompts and re-run to compare scores.
- Add different Checks in the UI or in SDK calls to fit your use case.
- Automate nightly runs in CI using the SDK.
Ready to move beyond prompts? See Custom Endpoint Multi-Turn to plug in your own API.
That's it! You now have a complete, repeatable workflow for evaluating assistants with prompt-based multi-turn simulations—entirely from the browser or your codebase.